At the end of this tutorial, you will have user interface like the following:
Registration Form
Login Form
Dashboard
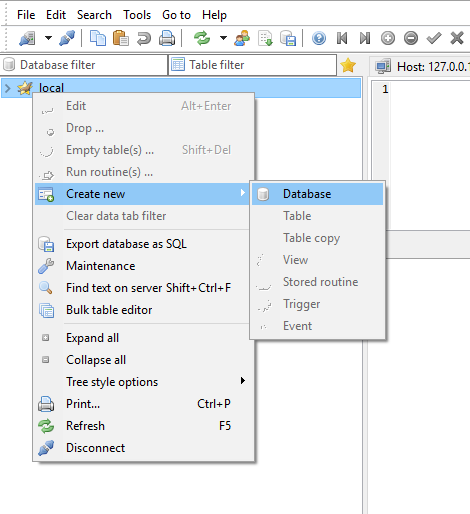
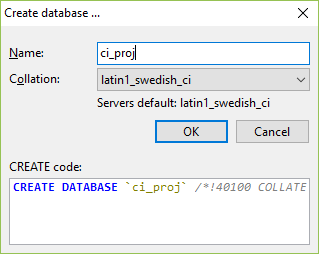
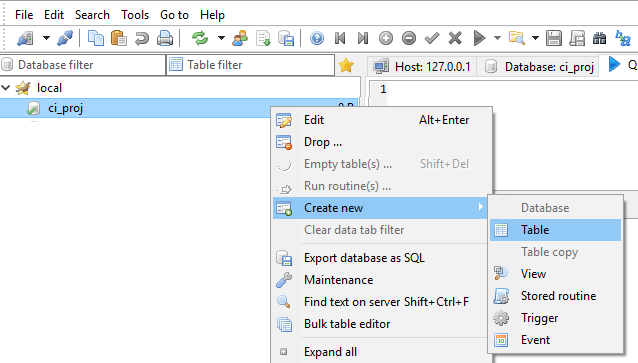
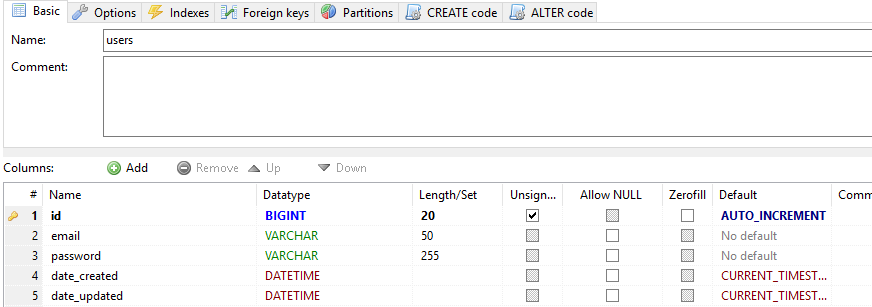
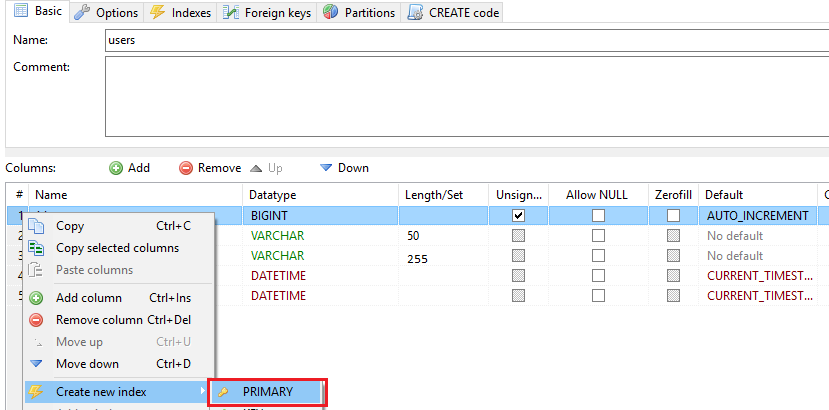
Step 1. Create a table
You could name your table whatever you want to call it, we’ll be naming it “users” table for this tutorial. This table would contain user information which you could extend later on real world projects.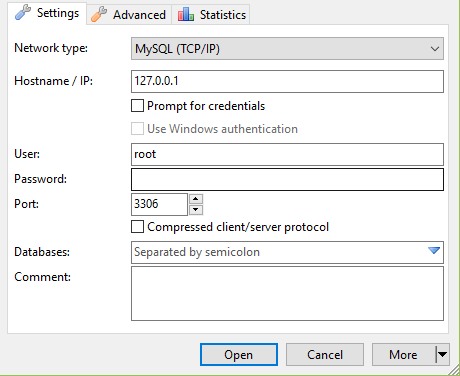
Open your Hiedi Sql and make sure your XAMPP MySQL service is running.
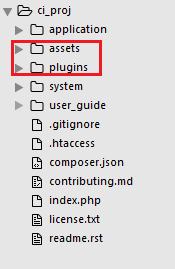
Step 2. Create assets and plugins folders on your root director
Step 3. Add Template library
We’ll be using a library called Template to load our views. We could actually use the codeigniter's default way of loading views, but in this example we'll be using a library. You could download the library from here and save it under “ci_proj/application/libraries/”. We’ll be using this library every time we need to load a view. Thus, it would be better if we’ll just load it automatically so we don’t have to worry about having to add it in all of our controllers. We’ll also be adding “parser”, “database”, “session”, and “form_validation” along with some helpers. One of which is the string helper which allows us to manipulate strings, eg. Random_string() and a lot more. If you want to know more about it, the documentation is a great place to start with. Navigate to “application/config/autoload” and add the following:$autoload['libraries'] = array('parser', 'template', 'database', 'session', 'form_validation');
$autoload['helper'] = array('url', 'form','string');
Step 4. Create a Layout
The layout is like the frame of our web pages. This saves us time by not having to write the same html tags all throughout our pages. Copy the following code and make sure that all the file paths are correct. If you save your css or js files somewhere else, make sure to change the paths accordingly.<!DOCTYPE html>
<html>
<head>
<meta charset="UTF-8">
<title>KodeMadeSimple | <?=$template['title']?></title>
<meta name="viewport" content="width=device-width, initial-scale=1.0">
<link rel="stylesheet" type="text/css" href="<?= base_url('plugins/bootstrap_4_alpha_5/css/bootstrap.min.css') ?>">
<link rel="stylesheet" href="<?=base_url('assets/css/login.css')?>">
<script src="<?=base_url('assets/js/jquery-3.1.1.min.js')?>"></script>
<script> var base_url = '<?= base_url() ?>'; </script>
</head>
<body>
<?php if(isset($template['partials']['header'])) echo $template['partials']['header']; ?>
<?= $template['body'];?>
<?php if(isset($template['partials']['footer'])) echo $template['partials']['footer']; ?>
<script type="text/javascript" src="<?= base_url('plugins/bootstrap_4_alpha_5/js/tether.min.js') ?>"></script>
<script type="text/javascript" src="<?= base_url('plugins/bootstrap_4_alpha_5/js/bootstrap.min.js') ?>"></script>
<?= $template['metadata']; ?>
</body>
</html>
Step 5. Create Footer Partial
I know what you’re thinking… Yes!, of course. You could create your own header partials too. You could create multiple of them if you need to. But for this tutorial, we’ll only be needing a footer. Under “views/” create a folder and name it as “partials” then create a file named “footer.php” and paste the following code.<footer> kodemadesimple @ 2016 </footer>You don’t see any
<html></html>nor
<body></body>tags here since it has already been defined on our main layout. If you look at our “main.php” file, you’ll see that we’re printing out our footer partial page right before loading our scripts.
Step 6. Create Registration View
We first need a registration page before we could login. In our views page, lets make a new page and paste the following code.
<div class="row">
 <div class="row" id="login-wrapper">
  <form action="#" id="registration-form">
   <div class="form-group">
    <input class="form-control form-control-lg" type="text" placeholder="Email" name="email">
   </div>
   <div class="form-group">
    <input class="form-control form-control-lg" type="password" placeholder="Password" name="password">
   </div>
   <div class="form-group">
    <input class="form-control form-control-lg" type="password" placeholder="Confirm Password" name="confirm-password">
   </div>
   <div class="form-group">
    <button class="btn btn-lg btn-outline-success btn-block" data-loading="please wait..." type="submit">Registration</button>
   </div>
   <div class="form-group"><i>Already have account? <a href="<?=base_url('login')?>">login</a></i></div>
  </form>
 </div>
</div>
Step 7. Create Registration Javascript file
We’re not be using the default property of our form html tag to submit our form, instead, we’ll be using ajax. If you’re familiar with ajax, good, if not don’t worry, it’s not that complicated as you would imagine. Lets go ahead and create a js file under "assets/js/" and name it as "registration.js" then paste the following code.
$(function(){
 $("#registration-form").on("submit",function(e){
  e.preventDefault();
  console.log(base_url);
  var $btn = $(this).find('button[type="submit"]');
  $.ajax({
   url: base_url+'Ajax_registration/register',
   type: 'POST',
   dataType: 'JSON',
   data:$(this).serialize(),
   beforeSend:function(){
    $btn.button('loading');
   },
   success:function(response){
    $btn.closest('form').find('span.text-success').remove();
    $btn.closest('form').find('span.text-danger').remove();
    $('.form-group.has-error').removeClass('has-error');
    $('.form-group').find('span.text-danger').remove();
    switch(response.status){
     case 'form-incomplete':
     $.each(response.errors,function(key,val){
      if(val.error!=''){
       $(val.field).closest('.form-group').addClass('has-error');
       $(val.field).closest('.form-group').append(val.error);
      }
     })
     break;
     case 'success':
     console.log('Success!');
     $btn.closest('form').append("<span class='text-success'>"+response.message+"</span>");
     window.location.replace(base_url+'login');
     break;
     case 'error':
     $btn.closest('form').append("<span class='text-danger'>"+response.message+"</span>");
     break;
    }
   },
   error: function(jqXHR,textStatus,error){
    console.log('Unable to send request!');
   }
  }).always(function(){
   $btn.button('reset');
  });
 })
})
What this does is it serializes all form inputs and submit it to "ajax_registration" controller which we'll be creating in a moment. After our controller is finished registering the new user it then return a response to our ajax success callback, the switch case in our success callback will then display the appropriate notification based on the request status whether it be success, form-incomplete or error.Step 8. Create Ajax_registration Controller
Go ahead and create a controller and name it as "Ajax_registration". Then paste the following code<?php if ( ! defined('BASEPATH')) exit('No direct script access allowed');
class Ajax_registration extends CI_Controller {
public function __construct()
{
parent::__construct();
$this->load->model('users_model');
}
public function register()
{
if(!$this->input->is_ajax_request()){
show_404();
}
$this->form_validation->set_error_delimiters('<span class="text-danger">', '</span>');
$this->_validate();
$response= false;
if(!$this->form_validation->run()){
$response['status'] = 'form-incomplete';
$response['errors'] = array(
array(
'field' => 'input[name="email"]',
'error' => form_error('email')
),
array(
'field' => 'input[name="password"]',
'error' => form_error('password')
),
array(
'field' => 'input[name="confirm-password"]',
'error' => form_error('confirm-password')
)
);
}
else{
try{
$this->db->trans_begin();
$email=$this->input->post('email');
$password=$this->input->post('password');
$password=password_hash($password, PASSWORD_BCRYPT, array("cost" => 12));
$data=array(
'email' => $email,
'password' => $password,
'date_created' => date('Y-m-d H:i:s')
);
$this->users_model->add($data);
if(!$this->db->trans_status()){
$this->db->trans_rollback();
$response['status']='error';
$response['message']='Something went wrong while saving your data';
}else{
$this->db->trans_commit();
$response['status']='success';
$response['message']='Successfully added new record.';
}
}
catch(Exception $e){
$this->db->trans_rollback();
$response['status']='error';
$response['message']='Something went wrong while trying to communicate with the server.';
}
}
echo json_encode($response);
}
public function _validate(){
$rules=array(
array(
'field' => 'email',
'label' => 'Email',
'rules' => 'required|trim|valid_email'
),
array(
'field' => 'password',
'label' => 'Password',
'rules' => 'required|trim|min_length[6]'
),
array(
'field' => 'confirm-password',
'label' => 'Confirm Password',
'rules' => 'required|trim|min_length[6]|matches[password]'
),
);
$this->form_validation->set_rules($rules);
}
}
/* End of file */
/* Location: ./application/controllers/ */
This controller validates the inputs then add a new record on the users table if it passes the rules which we created on "_validate". If your wondering what transaction does, well, basically it keeps track of our database queries and executes the queries inside it if all queries does not produce error. It's either perform all queries or nothing at all. You should be able to register users now. If not, don't quit keep trying, you'll get there.Step 9. Create Login Controller
I'm assuming that you've already have a registered user, you could check it on your database.Open your database then check users table. If you do, you can proceed to this step. Create a Login.php file under “application/controllers/” and paste the following code.<?php if ( ! defined('BASEPATH')) exit('No direct script access allowed');
class Login extends CI_Controller {
public function __construct()
{
parent::__construct();
$this->load->model('users_model');
}
public function index()
{
if($this->session->userdata('user_info')['logged_in']){
redirect(base_url('dashboard'), 'refresh');
}
$this->template
->title('Login')
->set_layout('main')
->set_partial('footer', 'partials/footer')
->append_metadata('<script src="'.base_url("assets/js/login.js").'"></script>')
->build('login');
}
public function logout(){
$user_data = $this->session->userdata('user_info');
$this->session->sess_destroy();
redirect(base_url('login'), 'refresh');
}
}
/* End of file */
/* Location: ./application/controllers/ */
Be sure to capitalize “L” in naming “Login.php”, here is a forum you might want to check out later . If you’re not aware of the MVC pattern click here to know more. If your new to codeigniter you will find that we’ll be using “$this” keyword a lot. “$this” only means the codeigniter’s instance, another way to write this is get_instance(). The code above uses the Template library which we loaded automatically on our “autoload.php”. The title would be the title of the page which is dynamically printed on our “main.php” layout file. We’re also loading a partial file named footer which we have created on step 5. In addition, we’re appending a meta, our script files. This really saves us a lot of time thinking about how to reuse your code on your other pages. The “build(‘login’)” is would be the name of our view. If you want to pass a data to your view just pass it as a second argument.->build('login',array('name'=>'kodesimple'));
Step 10. Create Login view
We haven’t created our view yet, navigate to “application/view/” and create a “login.php” file. We are not required to capitalize the first letter of our view filename. Paste the following code.<div class="container">
<div class="row">
<div class="row" id="login-wrapper">
<form action="#" id="login-form">
<div class="form-group">
<input class="form-control form-control-lg" type="text" placeholder="Email" name="email">
</div>
<div class="form-group">
<input class="form-control form-control-lg" type="password" placeholder="Password" name="password">
</div>
<div class="form-group">
<button class="btn btn-lg btn-outline-success btn-block" data-loading="please wait..." type="submit">Login</button>
</div>
<div class="form-group">
<span class="pull-right"><i>Not registered yet? click <a href="<?=base_url('registration')?>">here</a></i></span>
</div>
</form>
</div>
</div>
</div>
You could add your own custom style here just make sure to leave the form id and input names the same since we’ll be needing those later.Step 11. Create Login Javascript file
If you’re eager to see the output of what we’re doing, you’ll notice on the console that we’re having some error with regard to our javascript file. That is because we haven’t created our “login.js” file yet. Let’s do that by creating a javascript file under “application/assets/js/” and name it as “login.js”. You'll notice that it is similar to our "registration.js" it's just submitting to a different url. Paste the following code on your “login.js” file,$(function(){
$("#login-form").on("submit",function(e){
e.preventDefault();
console.log(base_url);
var $btn = $(this).find('button[type="submit"]');
$.ajax({
url: base_url+'Ajax_login/authenticate',
type: 'POST',
dataType: 'JSON',
data:$(this).serialize(),
beforeSend:function(){
$btn.button('loading');
},
success:function(response){
$btn.closest('form').find('span.text-success').remove();
$btn.closest('form').find('span.text-danger').remove();
$('.form-group.has-error').removeClass('has-error');
$('.form-group').find('span.text-danger').remove();
switch(response.status){
case 'form-incomplete':
$.each(response.errors,function(key,val){
if(val.error!=''){
$(val.field).closest('.form-group').addClass('has-error');
$(val.field).closest('.form-group').append(val.error);
}
})
break;
case 'success':
console.log('Success!');
$btn.closest('form').append("<span class='text-success'>"+response.message+"</span>");
window.location.reload(base_url+'dashboard');
break;
case 'error':
$btn.closest('form').append("<span class='text-danger'>"+response.message+"</span>");
break;
}
},
error: function(jqXHR,textStatus,error){
console.log('Unable to send request!');
}
}).always(function(){
$btn.button('reset');
});
})
})
Step 12. Create Ajax_login Controller
Now that we’ve created a javascript file which serializes our email and password, we need to create the destination controller “Ajax_login” with a method “authenticate”. Paste the following code inside your newly created controller.<?php if ( ! defined('BASEPATH')) exit('No direct script access allowed');
class Ajax_login extends CI_Controller {
public function __construct()
{
parent::__construct();
$this->load->model('users_model');
}
public function authenticate()
{
if(!$this->input->is_ajax_request()){
show_404();
}
$this->form_validation->set_error_delimiters('<span class="text-danger">', '</span>');
$this->_validate();
$response= false;
if(!$this->form_validation->run()){
$response['status'] = 'form-incomplete';
$response['errors'] = array(
array(
'field' => 'input[name="email"]',
'error' => form_error('email')
),
array(
'field' => 'input[name="password"]',
'error' => form_error('password')
)
);
}
else{
try{
$email=$this->input->post('email');
$password=$this->input->post('password');
$where = array(
'email' => $email
);
$user=$this->users_model->getOneByWhere($where);
if(count($user['id'])){
if(password_verify($password,$user['password'])){
/*
|Correct email and password.
*/
$response['status']='success';
$response['message']='Successful Login';
$user_data=array(
'user_info'=>array(
'email'=>$email,
'logged_in'=>1
)
);
$this->session->set_userdata($user_data);
}
}
else{
$response['status']='error';
$response['message']='Please check your email or your password';
}
}
catch(Exception $e){
$this->db->trans_rollback();
$response['status']='error';
$response['message']='Something went wrong while trying to communicate with the server.';
}
}
echo json_encode($response);
}
public function _validate()
{
$rules = array(
array(
'field' => 'email',
'label' => 'email',
'rules' => 'trim|required'
),
array(
'field' => 'password',
'label' => 'Password',
'rules' => 'trim|required|min_length[6]'
)
);
$this->form_validation->set_rules($rules);
}
}
/* End of file */
/* Location: ./application/controllers/ */
We could actually reuse our “Login” Controller for this but I just want to separate ajax related stuff. The first thing that the code does is it validates our inputs using CodeIgniter’s form validation library which have been auto loaded. The “_validate” function is where we set the validation rules. If our inputs failed to pass the rules which we defined, our “authenticate” function will return all the errors including a status “form-incomplete” which will be manipulated on our “login.js”. What I mean is, if you take a look on our “login.js” file, you would notice our switch case which iterates over our error response. However, if our inputs passed the rules, the email and password will be checked if it exists on our users table. If email doesn’t exist or password doesn’t match with the email, an “error” status will be raised and will be sent back to the ajax success callback. But if the email and password do exist then a session variable “user_info” will be created which contains our email and a “logged_in” flag.Step 13. Create a Dashboard view
We'll be creating a landing page after successful login. I used bootstrap cover template in the dashboard page. You could create your own or just customize bootstrap templates. Paste the following code.<link rel="stylesheet" href="<?=base_url('assets/css/cover.css')?>">
<link href="https://fonts.googleapis.com/css?family=Open+Sans:300" rel="stylesheet">
<style>
.site-wrapper-inner{
background: #fff;
font-family: 'Open Sans', sans-serif;
text-shadow: none;
}
.site-wrapper-inner,.nav-masthead .nav-link{
color:#3a3939;
}
.nav-masthead .active{
color:#adadab;
}
.text-xl{
font-size:2em;
}
.text-md{
font-size:1.2em;
}
</style>
<div class="site-wrapper">
<div class="site-wrapper-inner">
<div class="cover-container">
<div class="masthead clearfix">
<div class="inner">
<h3 class="masthead-brand">Cover</h3>
<nav class="nav nav-masthead">
<a class="nav-link active" href="#">Home</a>
<a class="nav-link" href="<?=base_url('login/logout')?>">Logout</a>
</nav>
</div>
</div>
<div class="inner cover">
<article class="col-xs-12">
<h1 class="cover-heading">
<span class="text-xl">Hi</span>
<span class="text-md"><?= $this->session->has_userdata('user_info')?$this->session->userdata('user_info')['email']:"There" ?></span>
</h1>
<p>
<?=$message ?>
</p>
<p class="lead">
Cover is a one-page template for building simple and beautiful home pages. Download, edit the text, and add your own fullscreen background photo to make it your own.
</p>
<p class="lead">
<a class="btn btn-lg btn-secondary" href="#">Learn more</a>
</p>
</article>
</div>
</div>
</div>
</div>
Step 14. Create a Dashboard Controller
Create a controller and name it as "Dashboard" then paste the following code. You can download the css file from here. What the code in our constructor function does is it checks the user session. If session variable user_info index "logged_in" equals 1 then the page will be displayed, otherwise, will be redirected to login page. Create a javascript file and name it as "workaround.js" then paste the following code./*!
* IE10 viewport hack for Surface/desktop Windows 8 bug
* Copyright 2014-2015 The Bootstrap Authors
* Copyright 2014-2015 Twitter, Inc.
* Licensed under MIT (https://github.com/twbs/bootstrap/blob/master/LICENSE)
*/
// See the Getting Started docs for more information:
// https://getbootstrap.com/getting-started/#support-ie10-width
(function () {
'use strict';
if (navigator.userAgent.match(/IEMobile\/10\.0/)) {
var msViewportStyle = document.createElement('style')
msViewportStyle.appendChild(
document.createTextNode(
'@-ms-viewport{width:auto!important}'
)
)
document.head.appendChild(msViewportStyle)
}
})();
No comments:
Post a Comment